Understanding the Teac X-1000R and X-2000R auto reverse

Transports
This is an article that has taken many hours of frustration to put together. While the Teac X-1000R and X-2000R are high end reel to reel tape decks and when working, are great sounding decks, one of the most common problems is a malfunction in the tape transport in either the forward or reverse directions. This causes the tape to droop between the two pinch rollers, so that the tape loses contact with the heads, and muffled and/or no sound occurs. This problem can happen in one or both directions, and can occur within a couple of seconds of pressing ‘play’, or it can be intermittent, and only happen every few tapes.
Note that this article involves a tentelometer for some of the settings, and the entire article is considered to be for an advanced technician. While the amateur can check many of the potential problems causing tape drooping on these decks, under no circumstances should you try and adjust the tension adjustment controls (trimpots) without a tentelometer.
It’s also mandatory that you download and follow the service manual procedure along with the tips below.
Causes of tape drooping in either direction
While the Teac service manual is well written, it misses some of the details needed to understand how the tension across the tape heads is achieved, and some of the faults within the deck that can cause the tape to droop between the pinch rollers.
Basically, the X-1000 and 2000 uses dual capstans and pinch rollers to drive the tape across the heads. While a dual capstan drive is a more complex method of moving the tape through the transport, the consistent tension between the two pinch rollers gives more precise control of the tape against the heads, for a better sound quality. (at least, that’s what the manufacturers want you to believe. If you’ve ever fought with tape drooping from the heads, your opinion about a dual capstan drive may vary!)
The optical sensors behind each tension arm monitor tape tension, and send signals to the reel motors to keep tape tension constant from the beginning to the end of the tape. Therefore, everything in the tape path is critical to maintain this constant tension.
There’s a few key factors that contribute to tape drooping in either direction:
- wrong capstan belt installed
- incorrect pinch roller pressure.
- capstans/flywheels installed in the wrong position
- poor condition pinch rollers
- oxide buildup on the capstan shafts
- incorrect tension (too much or too little) on the supply or takeup reel
- incorrect tape threading on the tape path
- poor condition tape
Theory of operation
Both of the X series of 10” Teac decks work on the same principle of operation. The capstan belt loops around both capstan flywheels, and around the motor pulley. The capstan flywheels have raised ridges, so that the flywheel closest to the takeup reel (in either direction) is of a slightly larger diameter than the one furthest away from the takeup reel. This puts consistent tension on the tape running between the two pinch rollers, and the tape should ride nicely against the heads.
There’s a few key pieces of the puzzle that have to work properly so tape drooping does not occur.
Threading the tape correctly

Incorrect way to thread tape on a Teac X series

Correct way to thread tape on a Teac X series
Incorrect pinch roller pressure
The Teac service manual gives excellent instructions on how to adjust the pinch roller pressure nut on the top of the tape transport. You need a fish scale and some string to set that nut, follow the instructions in the service manual.
Correct Capstan Belt
The capstan belt MUST be of the correct thickness, diameter and width in order for it to ride on the flywheels properly. The big problem is, the cross-reference book that many sellers of belts online rely on gives the incorrect belt size, and the one most commonly supplied is too thick to work.
The only known supplier of the original OEM Teac belt is a seller in Boulder, Co. that goes by Dave’s Vintage Audio, seller ID Dave_N_S on eBay. Dave is the only known authorized seller of original Teac parts in the US.
Yes, his belts are more expensive than the generic ones. If you don’t want hours of grief, order the right one. Don’t cheap out here.
Clean Capstan shafts
Since the diameter of the two capstan flywheels are very slightly different, the capstan shafts must be kept cleaner than on single capstan drive tape deck models. With the X series of the capstans, they are recessed under the head cover, and often get overlooked when cleaning the tape path.
You get a bit more access to the capstans by removing the head cover. If a deck has been subject to shedding or old tape for a period of time, a rim of oxide deposits will occur right above and right below the ¼” tape path. This buildup changes the diameter of the capstan very slightly, which can throw off the tape tension needed to keep the tape on the heads.

A TeacX-2000R run through about 10 rolls of new tape. You can see a very slight buildup on the capstan shaft of oxide above and below where the tape normally runs. Any more oxide buildup than what is shown here, and tape drooping can occur.

A more typical dirty tape path of an X series deck, showing massive oxide buildup on the capstan. Notice also the oxide buildup in the corners of the tape guide as shown on the far right, which will affect the tape path and operation of the deck.
Clean off the capstans with isopropyl alcohol and cotton swabs. IF you use some painter’s tape to hold up the left and right tension rollers, the deck will turn on the capstan motor, making cleaning much easier than if they are stationary.
Pinch rollers worn, or out of round.
If you don’t know the last time the pinch rollers were changed on your X series machine, stop now, and send your two rollers to terrysrubberrollers.com for recoating. We don’t trust the made in China ones sold online for cheap, and the pinch roller ‘tires’ that slide over the brass/metal core are a terrible idea as well. Don’t skimp here, do it right the first time.

The original Teac pinch roller has two grooves in it, as shown on the left. A rebuilt replacement from Terry’s is on the right, without the grooves.
Proper movement of the Capstan belt on the capstan flywheels.
Since it was stated earlier that the capstan flywheel is of slightly larger diameter that is closest to the takeup reel, what happens when the reverse direction is engaged? Doesn’t the tape skew off the heads, since the capstan flywheel diameter closest to the takeup reel (left reel in the reverse direction) is now smaller, and the right side capstan flywheel with the larger diameter now pushes more tape, causing drooping?
Well, this is where a large part of how the whole dual capstan/flywheel system is misunderstood. The capstan motor itself has three mounting screws on a triangular metal plate. If you look closely at the metal plate, the side with one screw has two washers under it, and either the top or bottom screw on the other side has a single washer under it. This means that the capstan motor shaft and pulley sit slightly cockeyed, and as the motor direction is reversed by going into reverse play, the capstan belt moves forward on the flywheels, so that the diameter of the left capstan flywheel is now larger than the flywheel on the right side of the deck.

Looking from the left side of the deck to the left side capstan flywheel, you can see the belt sitting towards the back of the flywheel in the forward play direction.

When reverse play is pushed, the capstan belt slowly moves towards the front of the flywheels. Since the diameter of the flywheels are different depending on the position of the belt, the tension of the tape across the heads is kept consistent, regardless of the direction that the tape is travelling.

Closeup of the right side of the motor mounting plate. The left side screw has a single washer under it, the top mounting screw on the right side does not have any washers between the two mounting plates.
More often than not, when someone replaces the capstan motor due to it burning out or being otherwise defective, those critical washers are left out when installing the new motor. If this happens, the capstan belt has no way to move forward or back on the flywheels, and tape drooping occurs. The bottom line is, don’t take the motor off the mounting plate unless it’s defective, and put the washers back under the correct corner of the triangular mounting plate. Hint: If you get a deck in that is missing the washers, you can loosen the three motor mounting screws, then take out the one screw that needs a washer under it, and slide a replacement washer(s) in, and reinstall the screw. This avoids taking the whole motor plate out of the deck, saving some time. It may take some trial and error to get the washer thickness and placement correct if the deck is missing them. The main thing is that the belt is at the back of the flywheels (towards the rear of the deck) in forward mode, and at the front of the flywheels in reverse play mode.
The service manual covers the washer location and size in the service manual, section 2-2 of both the X-1000 and X-2000 manuals (shown below).
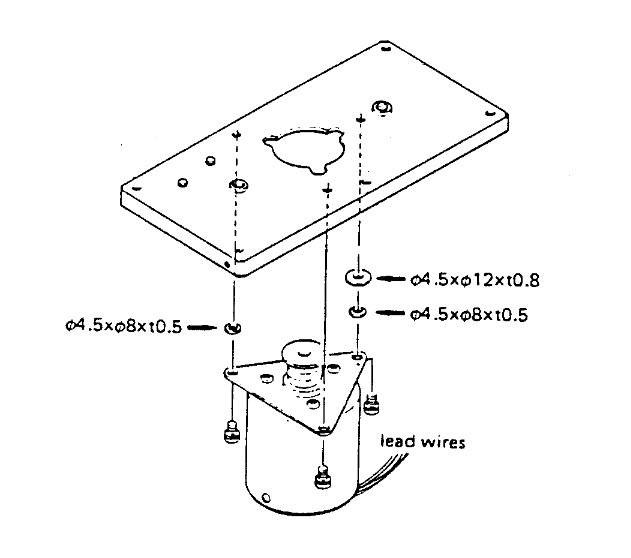
If you look carefully at the Teac X series service manuals, those washers are clearly shown in the exploded mechanical view.
Correct orientation of the capstan belt
The correct orientation of the capstan belt is also critical for proper movement of the capstan belt, forward and back (ask us how we know!). On the X-1000R, the belt loops up over the capstan motor pulley from the bottom of the motor mounting plate. The belt runs straight across the two capstan flywheels on the top of the flywheels as shown below.

Top view of the capstan flywheels. The capstan belt runs straight across the top of both flywheels.

The mostly obscured view of the bottom of the flywheels. The motor pulley sits in the middle, between the two flywheels, and the belt loops up and around the motor pulley from the bottom. Yes, it’s a pain to properly seat the belt around the motor pulley while putting the motor mounting plate back in place. Hold it in place with one or two screws only while rotating the flywheels without power applied, to make sure that the belt doesn’t fall off the motor pulley or one of the flywheels. Once that’s confirmed, then replace the remaining screws of the capstan flywheel plate.
Are the capstan flywheels in the correct position?
Each flywheel must be in the correct location in order for the whole dual capstan system to work. If someone has pulled out both capstans and accidentally interchanged them when reassembling the deck, then the tape will always droop off the heads in either direction. There’s no need to pull out the capstans. If you absolutely need to pull out the flywheels, only remove one at a time so there’s no possible way to put them in the wrong location.
The correct order to Adjust Tape Tension
Material Required
-assorted screwdrivers, including the proper JIS Philips head ones to fit the Japanese JIS screw heads in this deck (available on Amazon and eBay, etc)
– spring scales as shown in the service manual
– copy of the service manual
– tentelometer, and the knowledge how to use it
– refurbished pinch rollers from Terry’s Rubber Rollers
– new capstan drive belt that is original OEM Teac
– general purpose household oil
1) Replace the pinch rollers and capstan belt. Ensure that the very thin washers above and below each pinch roller are in place. Put a single drop of oil on the metal pinch roller shaft, to lubricate that sleeve bearing.
2) Follow the procedures on parts
Tape Tension Arms
DO NOT PROCEED FURTHER IF YOU DO NOT HAVE A TENTELOMETER!
The two tape tension arms that the tape reaches first and last in the tape path have an optical sensor behind each one, that senses the position of each tension arm. Both the X-1000R and 2000R work in the same way. Each sensor goes to a 3 pin connector on the transport motherboard. One pin has +15 volts DC on it, another one is the ground, and the third wire reads between 0 and 15 volts, depending on the position of the tension arm.
What the service manual doesn’t tell you is that when the tension arm sits at the mid-position of travel, the voltage of the position sensor should be at 5 volts.

Using painter’s tape to hold the tension arm at mid-position.

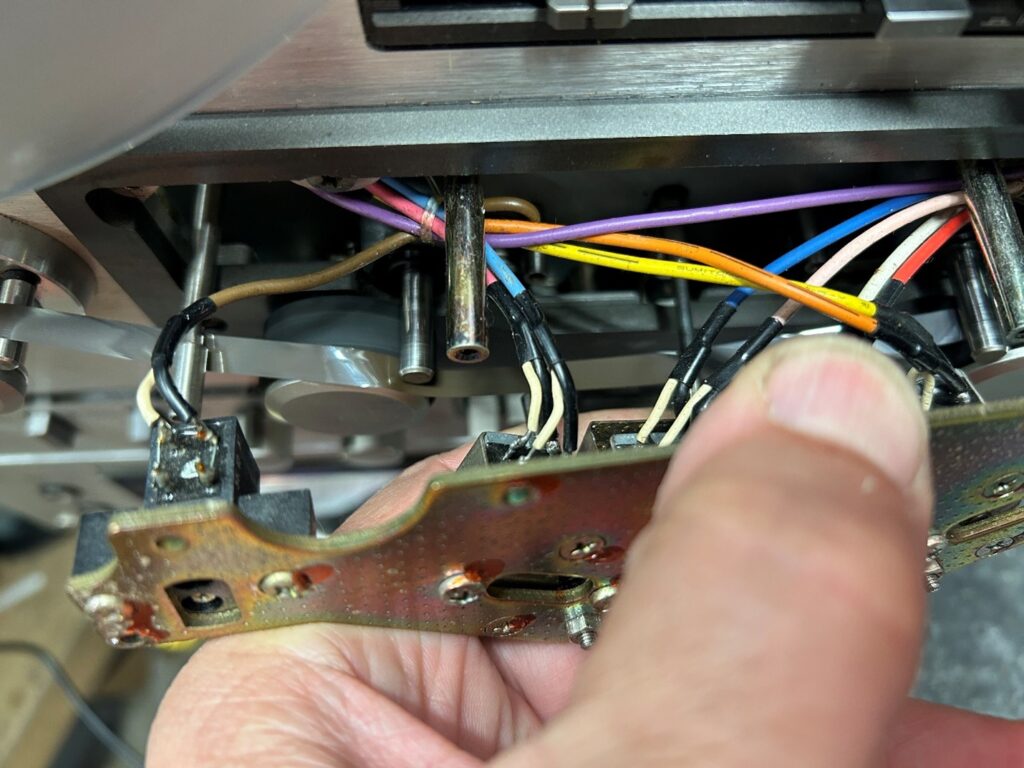
The two 3 pin connectors that go to each tension arm (X-1000R only).

The bottom pin of each 3 pin connector should be set to as close to 5 volts as possible with the tension arm in the mid-position.

The other tension arm taped to the mid-position is getting very close to that 5 volt reading.
The adjustment for the X-1000R is done by bending the mounting bracket of the opto sensor as shown in this YouTube video by Bigg Matt:
A tiny bit of movement on the bracket will cause a large change in voltage, so be careful when manhandling the bracket!
The X-2000R has a Philips screw adjustment that loosens the opto sensor bracket, allowing for more precise adjustment of the opto sensor voltage.

The final step is to follow the Teac service manual to set the trimpots for the tape tension correctly. Teac specifies the takeup and back tension to be 50-60 grams. (picture of a Teac X-1000R).
If the tape tension opto sensor has been adjusted, then the trimpot settings will need to be adjusted with a tentelometer.
To aid with the setting of the 50Kohm trimpot, it’s a good idea to change these to a 5 or 10 turn trimpot. The original Teac trimpots can go intermittent, so if their adjustment range is very narrow, pull those out, and use 5 or 10 turn ones. Those can be had at Mouser, Digikey, or any other good name brand electronics supplier.
Post Script May 2026
Since writing this article in January of 2026, I’ve had at least 5 of the X series decks come in, and I followed all of the above instructions. Then a week ago, a moderately used X-1000R came in with yet another problem not addressed in the above points.
The symptom was that in reverse play or record mode, the tape would slip off the front or back side of the left pinch roller. Forward play worked just fine. Generally speaking, 7” reels ran fine – the problem was primarily with 10” reels. Since the 10” reels have a larger diameter than 7” reels, the tape tension is somewhat lower, especially as the reel diameter gets smaller. While these Teac decks use the tension arm circuits to maintain constant tension on the reels, there is usually a bit of extra tension with the smaller reels, which is why the deck was acting up only with the 10” reels.
After doing all of the rudimentary service work (new OEM Teac belt, new pinch rollers, tension trimpots, etc), the problem remained. In speaking with the client, he bought the deck from an 80 year old previous owner, and once he got it home, it worked for a few hours, but then started acting up.
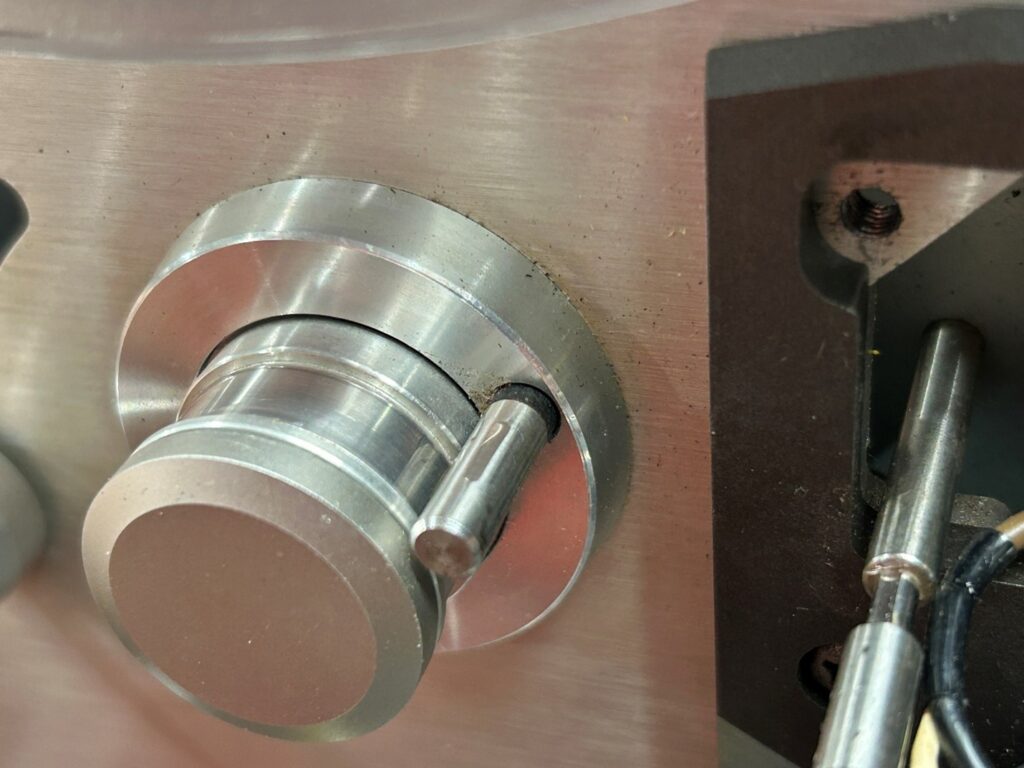
Looking at the flat spot on the reverse direction sensing pin, the deck had been moderately used, although the heads didn’t have a lot of wear on them. Still, for a steel pin to develop a flat spot, the deck had more than a few hundred hours on it. These pins can be loosened from the back of the deck, and rotated, so un-flattened virgin metal can touch the tape
After leaving the deck overnight after working on it for a few hours, I happened to have a second Teac X-1000R deck in the shop that worked perfectly, so I decided to compare the two decks to try and narrow down the cause of the skewing tape. At first glance, threading a tape through the two decks, and carefully looking at the tape guides (the middle two of which between the heads can be adjusted by the nut on top of the head stack, those two pins are spring loaded), the tape was riding right in the middle of the guides, exactly how it should be.
I then decided to remove the head block from its mounts, but I left all the head wires connected. By holding the head block up and out of the way, I could run the tape in play mode, and then observe how the tape sat on the two pinch rollers. With the working X-1000R, the tape was right in the middle of the pinch rollers, with no signs of travelling towards the outside.
With the faulty deck, as soon as I hit play in the reverse direction, the tape started skewing off the rollers immediately. That ruled out any issue with the head block.
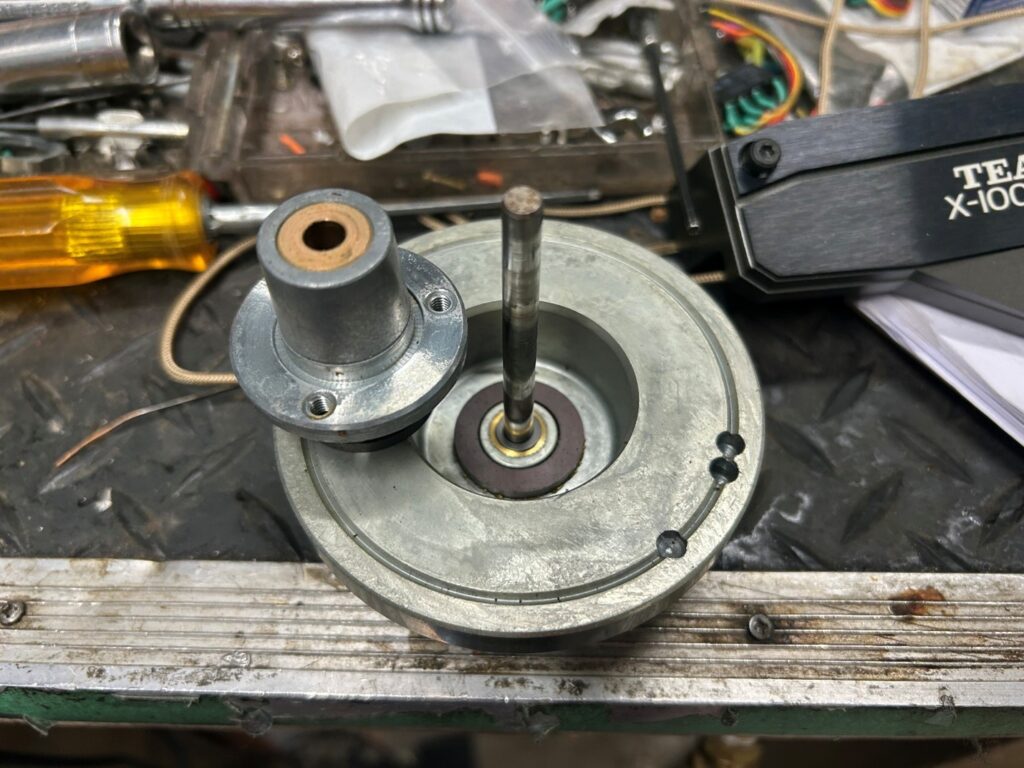
Since everything else was already replaced, I dug out my parts X-1000R unit, and since the problem was always related to the left pinch roller, I pulled the deck apart, and replaced both the capstan shaft/flywheel and the sleeve bearing that the capstan sits in on the deck. To do this, the motor needs to be removed, the head block needs to be taken off (and moved to the side, with all of the wiring left intact), and the pinch rollers and plastic cover around the head stack need to come off.
At that point, the 3 screws holding the capstan sleeve bearing can be taken out and replaced.
Sure enough, as soon as everything was reassembled, and I ran tape through the deck with the head block held aside, the tape ran exactly in the middle of the capstan. I even pushed the tape off to one side in each direction on the pinch roller, to see if it would skew off, but no, with the new bearing and capstan shaft, the tape would always return to the middle of the pinch roller.
The chances of this happening again my lifetime are slim to none, but it is yet one more example that even a comprehensive troubleshooting guide isn’t going to find every problem. I did compare the play of the capstan shaft in the sleeve bearing by hand, and could find no differences by hand. Keep in mind of course that the tolerances are very tight, and if I sent a good capstan and bearing and a bad one out to a machine shop to measure these tolerances, I’m sure they’d find that the problematic one was a mile off.