
A common occurrence with reel to reel tape decks is the shifting of the reel tables that the take-up and supply reels fit onto. If a deck is handled roughly during shipping, or if a deck falls forward on its face, there’s a good chance that a reel table has shifted on the motor shaft. Note that most reel tables on single motor tape decks cannot be adjusted, however in 3 motor decks where both reel motors are direct drive, a simple adjustment can be done to adjust the reel table to prevent tape scraping, or a jammed tape path where either the take-up or supply reel is hitting the front face of the tape deck.
If a reel table is damaged, or bent, you can also use this procedure to replace the reel table assembly, or just the part that clamps to the motor shaft. Some Akais and Teac/Tascams suffer from bad casting of the reel table, which can crack or disintegrate over time.
We’ll take a look at the Tascam 38, a ½” 8 channel deck that came in recently with shifted reel tables. By taking off the NAB hub, you can see that someone used green painter’s tape to build up the height of the NAB hub so that the reel of tape would clear the front panel. That’s not the right way to do things, although I’m sure this got them by in an emergency. With this deck, I found that both reel tables had been pushed into the deck, you can see the scrape marks around the plastic cover of the deck, where the reel had hit it.

The Tascam 38 is similar to many other Tascam/Teac decks in the way that the reel tables mount to the motor shafts. 3 motor Akais, Sonys, Pioneers, and Otaris are also similar, as well as other decks.
To see how the reel table is mounted to the motor shaft, take the back off the tape deck. In the case of this Tascam, the plastic back panel comes off, then 6 more screws hold on the metal U cover that makes up the top and two sides of the deck.
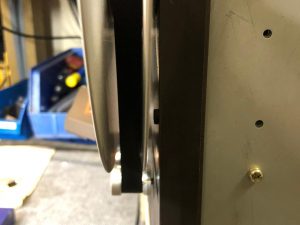
With the back and sides removed, you can see through the opening between the chassis and the front cover that there are two Philips screws that hold the reel table to the motor shaft. Many Akai decks are similar, although access to the reel table screws are done through the side of the deck. Some brands of decks use Allen screws instead of Philips head screws. Make sure that you use a (usually) Metric Allen key for a proper fit to loosen the screws.

Use a suitable Philips screwdriver to loosen (1 turn max!) the one or two screws holding the reel table to the motor shaft. Depending on whether the reel table screws simply came loose or whether the deck had been dropped on its face will determine whether you can wiggle the reel table back to the normal position, or whether you may need to use a small flat blade screwdriver between the motor face and the back of the reel table shaft to bring the reel table back to the proper position. If the reel table is stuck on the motor shaft, gently use a flat blade between the back of the reel table and the motor shaft, working around the motor shaft in a few places to get the reel table loose.
Once the reel table is loose, you can likely slide it forward and back on the motor shaft. If you push it out too far, you can nudge it back with your fingers, or tap lightly on the face of the reel table with the palm of your hand to tap it back towards the motor shaft.
Once the reel table is roughly back to where it should be, put the NAB hub back on, and thread a tape onto the machine and to the take-up reel.
Looking at the side of the deck, you should be able to see if the tape comes off the supply reel and is guided onto the first tape guide from the middle of the reel, and similarly, the tape should come off the last tape guide on the right side of the deck so that it places the tape onto the middle of the reel with an equal gap between the front and rear of the tape reel.
The below picture shows the reel table slightly too far forward, as the tape is being put on the take-up reel too close to the back metal flange. If the take-up reel is warped slightly, the tape will scrape against the back metal reel.
This picture shows the reel table properly adjusted, so that the tape falls exactly between the front and rear tape reel flanges, resulting in a noise free tape path and an even tape pack as you play the tape through. Check FF and REW before tightening up the reel tables fully (don’t strip the screws!) to make sure the reel table height is properly set for both supply and take-up reels.
