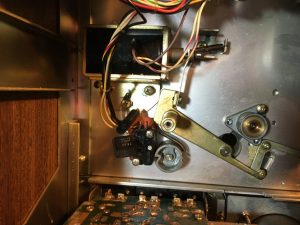
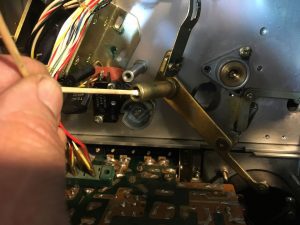
One of the most common problems with many versions of Teac and Tascam models is a seized or slow moving pinch roller bearing assembly.
This causes the pinch roller to engage very slowly or not at all to the capstan. The tape may not move at all in the play mode, or it may zip through the machine quickly, depending on the type and size of reel on the deck. This affects many Teac models, but the repair is very similar on all decks.
The cause of the problem is common to all models; the white lithium grease that Teac used when assembling the machines hardens over time, seizing the sleeve bearing that the pinch roller pivots on. Fortunately, it’s a relatively easy fix, with a minimum amount of tools needed.
You’ll need:
-

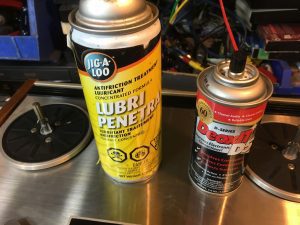
Here’s the typical spray chemicals that we use on tape decks, a penetrating spray oil, and DeOxIt, that will leave a thin silicone film on the bearing to lubricate it Heat gun (a wallpaper/paint stripper works great)
- New capstan belt to replace while you’re in there (unless you know it’s been replaced within the last 2 years)
- Appropriate Philips screwdrivers
- Thin straight blade screwdriver
- Cotton swabs
- Paper towels
- Allen wrench set to remove the flywheel from high speed Teac decks (7 ½ and 15 IPS)
- Silicone spray
- Penetrating spray
- Linesman pliers
- Needlenose pliers
- Camera to take pictures of what you’re doing (not mandatory, but always a good idea).
For this example, we are using a Teac 3340S 4 channel reel to reel tape recorder that had a badly seized bearing. Note that if you have a Teac deck like this, and you notice that the pinch roller is starting to move slowly, you’re best off doing this procedure before the pinch roller seizes completely. It’s much harder to do this work once the pinch roller bearing has stuck in place. The pinch roller should move up and down freely with no resistance. With the deck power off, push the pinch roller up to the capstan shaft with your finger, and let go. If it falls back down freely, you’re fine, but if it stays up, or moves down slowly, get your toolbox out, and do the following.
Here’s step-by-step instructions to fix the pinch roller bearing for the next 10 + years.
Step 1
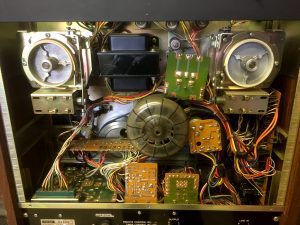
Take off the back of the deck, which usually is 6 Philips screws. In the case of a semi pro deck like the Teac 80-8, there are a total of 9 screws to remove, and the L shaped back will come right off, exposing this view
Step 2
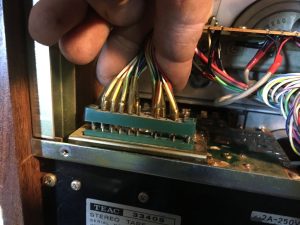
You will see the capstan flywheel as a large brassy colored wheel that is connected to the main capstan motor via the main drive belt. You will also see the tape transport wiring harness on the left side of the deck that has a large multipin connector on it. This connector pulls out and unplugs, giving better access to the flywheel and belt. Unplug this connector if your model of Teac has it, and move it well out of the way.
Step 3
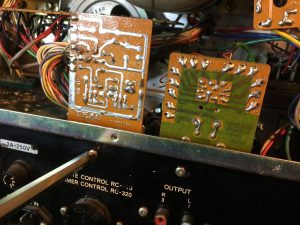
Some models of Teacs have a small PC board that is also somewhat in the way of the flywheel and belt. Some models have this PC board screwed to the back of the deck via two screws that go through the PC board. Other models have the two screws through the back of the set below the PC board. Undo these two screws, and move the PC board(s) out of the way.
Step 4

You now have relatively easy access to the metal plate that holds the flywheel in place. Some decks have one or two wiring harnesses screwed to the metal plate via two plastic clamps that are held in place with Philips screws. Remove these screws and remove the plastic wire harness clamps. If the decks have had high hours on them, these plastic clamps may be brittle, and can snap when you’re taking them out. You can either leave these clamps out when reassembling the deck, or you can get new similar plastic clamps from a place like Home Depot. Once those clamps are removed, the wiring harness(es) can be moved out of the way, exposing the metal plate that sits over the capstan flywheel.
Step 5
Remove the two Philips screws holding the plate in place over the capstan flywheel, and put that plate aside. Some decks have a PC board attached to the plate as this one does, so simply move the plate and PC board out of the way.
Step 6
Remove the belt from around the capstan flywheel and motor shaft. While you can take the motor off its mount via 3 Philips screws, there’s really no need to, as you can reach around the motor mounts to put the new belt back onto the motor pulley when you reassemble the deck
Step 7
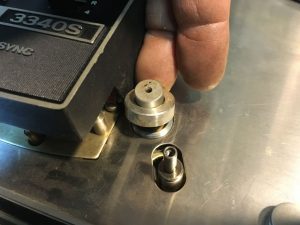
On the front of the deck, the capstan has a metal sleeve that screws down over the capstan shaft. Remove it as shown. Depending on the deck you have, the capstan shaft and flywheel either remove completely from the back of the deck, or you may need to unbolt the flywheel from the capstan shaft. Under the metal sleeve on the front of the deck, a slow speed Teac (3 ¾ and 7 ½ IPS) will have a rubber grommet that acts as a stopper, preventing the capstan shaft from moving backwards. Using a thin straight blade screwdriver, wiggle that grommet from the base of the capstan shaft, and roll/slide if off the capstan and put it aside. From the back of the deck on the low speed decks, pull on the flywheel, and the whole capstan shaft and flywheel will come out in one piece.
On high speed decks ( 7 ½ and 15 IPS), there is no rubber grommet on the front, so the capstan flywheel has to be removed from the capstan shaft from the back. Take a note how far the capstan shaft sticks out from the back of the capstan flywheel, as it will need to be remounted in the same manner when you reassemble everything. The flywheel is held on with two Allen screws. They are metric, and any metric small Allen key set will have the correct size Allen wrench to remove it. Remove the flywheel, leaving only the capstan shaft in place. Remove the rubber pinch roller by unscrewing the metal cap holding it in place, and put it and the pinch roller aside.
Step 8
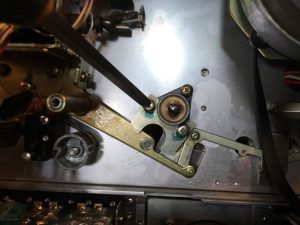
Attached to the capstan bearing is a U shaped piece of metal that is held to the capstan bearing with two Philips screws. Remove that piece of metal and the two screws and set them aside.
Step 9
Below is a picture of the pinch roller solenoid, held to the chassis with 3 Philips screws. Remove the 3 screws, and slide the solenoid plunger out of the solenoid. This then allows you to move the solenoid out of the way. Remember which screws hold the solenoid to the chassis, as they are shorter than other screws you’ve removed. If you use longer screws when you reassemble the solenoid, you’ll dimple the front metal of the deck.
Also note that there are slots on the solenoid that allow you to move the solenoid forwards and backwards on those 3 screws. Make a rough note where the solenoid sits in relation to the screws and slots, as this affects how the pinch roller moves towards the capstan shaft. When you reassemble this solenoid, the pinch roller may not engage properly if the solenoid is located all the way forward or all the way back in this adjustment range.
Step 10
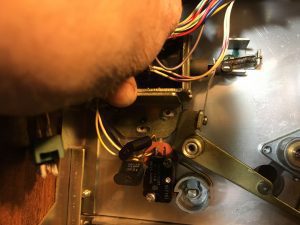
To the left of the pinch roller bearing that we are concerned with, you will see either one or two microswitches that sit at the tape tension and shutoff lever. The tape tension/shutoff lever is connected to a plastic spacer with a thin spring, which provides tension on the lever. While you can take out both screws of the microswitches, and move them out of the way, putting the spring back onto the tape tension lever is a pain. It’s much easier to remove the top screw of each microswitch and loosen the bottom one, allowing you to rotate the switch assembly to the left and away from the pinch roller bearing.
Step 11
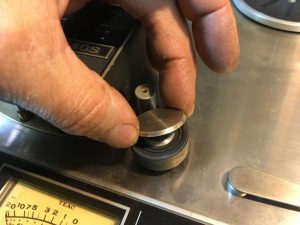
Here comes the fun part, depending on how badly the pinch roller bearing is seized… When the pinch roller bearing moves freely, the pinch roller assembly will slide right off the bearing shaft as shown. Once the grease congeals, it’s impossible to slide the assembly off the shaft without some help. Here’s what we’ve found to be effective:
On the top of the bearing, squirt some penetrating oil, and then use a heat gun to heat up the bearing assembly. Be very careful not to direct the heat towards any wiring harness, as they will melt. Heat up the bearing for about 10 seconds or so. There’s a good chance you’ll see some of the penetrating oil evaporate, but some will also be absorbed by the bearing. Repeat this about 3 times, and wiggle the capstan lever assembly by rotating it with a pair of linesman pliers, pulling up at the same time.
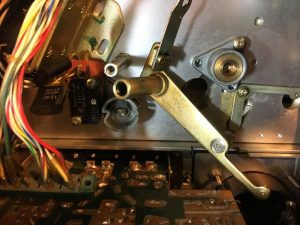
The capstan bearing shaft is held to the chassis by a single screw on the underside of the front metal plate. It’s not uncommon for this screw to come loose over time. All you’re trying to accomplish is to slide the capstan lever assembly off the shaft. You will need to use some force and pressure to free up that capstan lever bearing, but don’t overdo it. Keep adding penetrating oil and heat and pressure to the capstan lever, and eventually it will slide off the capstan bearing shaft.
Step 12
Once the capstan lever sleeve has been removed from the shaft, squirt some penetrating oil onto a cotton swab. Thoroughly clean the inside of the capstan lever sleeve as shown below. Use a paper towel soaked in penetrating oil to clean all remainder of the old lithium grease off the shaft. You may think that there’s a lot of grease that will come off the bearing, and there won’t be. It’s amazing what a tiny amount of hardened grease will do to a bearing that is supposed to move freely!
If the pinch roller bearing shaft is loose, tighten it by rotating it clockwise, and the Philips screw that sits under the front panel will tighten nicely. Use needlenose pliers to grab that shaft closest to the front of the deck. Don’t grab it by the shaft itself, or you can cause a burr, which may affect the pinch roller lever operation.
Step 13
Once everything has been cleaned off, you’re now ready to reassemble. Spray a tiny bit of silicone spray down the capstan lever sleeve. This will provide the lubrication to keep the capstan lever sleeve moving freely.
Step 14
Reassemble the deck! Install that new belt, making sure that the belt sits properly within the motor pulley. If it rides up on one edge, your tape speed will increase by about 30%.
Don’t forget to position the microswitches correctly so that they activate when the tape tension lever drops to the resting position. Also, when putting the solenoid back in place, you also have some up/down wiggle room as well as that forward/backwards positioning via the slots in the solenoid mounting plate. If the solenoid is skewed upward or downwards a bit, the solenoid plunger may stick, due to the plunger not sliding smoothly within the solenoid. Loosen the three screws holding the solenoid in place, and adjust the solenoid upwards or downwards slightly so that the plunger and pinch roller lever assembly is smooth. Check this by hand before you tighten all screws.
Step 15
When you’ve reassembled everything, leave the back off the set, thread a tape, and check for proper operation. It may be necessary to move the pinch roller solenoid slightly forwards or backwards so that the pinch roller properly engages the capstan. Do this with the power cord unplugged! Then try the deck again. Once everything functions properly, put the back on the deck, and enjoy!


